In the Case Study, we will take a look at a drawn image and try to give insights into the marked attributes. This section is intended for studying the subject matter and coming up with notes solely for study purposes.
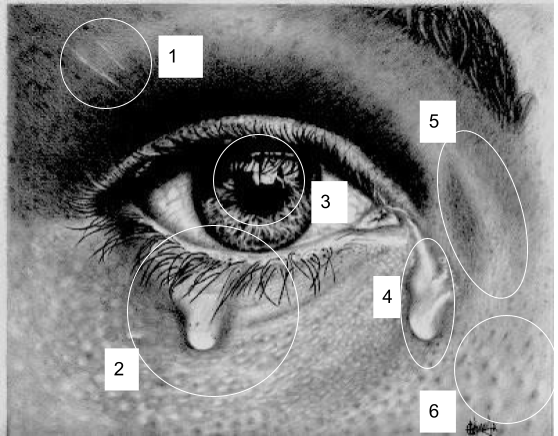
Figure 2C Image of Case Study
In section one, you can see that the challenge was to draw round and curved anatomy. When you are faced with this challenge in your drawing keep in mind the lighting. The way you handle the shading between the light and the slightly darker areas will determine how convincing the drawing to the human eye will become.
Remember, when the eyes see the drawing, the mind tries to compare the image with those stored in the subconscious mind, the image it sees every day, the more convincing the drawing is the more believable and realistic it appears to be.
Some tips to consider when drawing a curved rounded area of the figure is:
1. Direction of Light
2. How dark are dark areas
3. Prepare Clean Eraser to lighten up the lighter spots
4. Pay attention to detail, the blending between light and dark. Do not show where light and dark lines meet. Make it blend so that the human eye can not differentiate or tell where the two light and dark areas meet instead make it flow.
Drawing a water drop is one of the challenging projects or tasks to incorporate into a project.
When drawing a tear (which is a water drop) it is important to consider the light direction and make sure to fill in the details.
Something to watch out for when drawing a tear or a water drop is not to leave hard marks on the tear itself, this is important and at the same time, common sense as water drops do not have hard edges inside them. This applies to drawing smooth surfaces or baby faces.
When drawing a tear, rotating the reference image as well as the drawing itself to get the accurate shape from a different perspective is another technique to try. Keep in mind the faded shapes in the background or underneath the tear, it is the small detail that adds value to the drawing attribute.
Every part or section of the drawing represents something to the human eye, it is up to an Artist to challenge the level of detail. It is also worth noting that too much detail in the drawing section might ruin the drawing, finding the medium range and the focal point (focus) to put much effort into would contribute to bringing the drawing to realistic.
In the drawing [figure 2C] there are three main focuses. I applied much effort to the Pupil Section of the eye and also wanted the tears to stand out so that the audience could easily tell the emotion from the drawing.
Identifying attributes and emotions you want the audience to feel when looking at the drawing is very important, that way you (an Artist) will then prioritize how much time you would then spend on one section and what value you would like to see come out.
Section 3 in [figure 2C] is the focal point of the drawing, this is the section the audience notices. In order to spend more time working on the focal point section of the drawing, it is worth applying techniques we have learned in this book such as getting the outline right, rotating the reference image as well as the drawing to get perspective shapes, using a mirror to gain traction on how accurate the shapes are. Other techniques include changing the position of the audience in an effort to spot inaccuracy.
The focal point is the holy grail of the drawing when it comes to planning and brainstorming your ideas, this is the section that the audience won’t afford to miss. The whole drawing will be judged on this section, it is the eye-catching candy of the drawing.
Login to Continue, We will bring you back to this content 0